
Running TikTok ads without a pixel installed is the single most common reason eCommerce stores waste their ad budget. You get clicks. You get views. But you have no idea which campaigns drove actual sales, and TikTok’s algorithm has no data to optimize against.
Get Up to $6,000 in Free TikTok Ad Credits
TikTok offers ad credit incentives for new advertisers, helping you test campaigns with a lower upfront cost.
Most store owners either skip the setup entirely or install the pixel incorrectly and never notice. Both situations produce the same result: inaccurate data, poor ad targeting, and rising costs with no clear fix.
This guide walks you through every step of the TikTok Pixel setup for eCommerce, including Shopify, WooCommerce, and manual installs via Google Tag Manager.
You will also learn how to verify the pixel is firing correctly and fix the most common problems before they affect your campaigns.
Table of Contents
What is TikTok Pixel, and How Long does the Setup Take?
TikTok Pixel is a small JavaScript code snippet you place on your website. It sends user behavior data, such as product views, add-to-cart events, and completed purchases, back to TikTok so your ads can track conversions, build retargeting audiences, and improve campaign performance over time. Most eCommerce setups take 15 to 30 minutes, but only when you follow the correct steps and verify the pixel is firing before going live.
Why Does Every eCommerce Store Need TikTok Pixel?
According to Business of Apps, TikTok generated $23 billion in revenue in 2024, a 42.8% increase year-on-year. That level of advertiser investment exists for one reason: the platform delivers measurable results. But it only delivers results when your tracking is set up correctly.
As Per TikTok’s official documentation, the TikTok Pixel collects the following data from your site:
- Event data: Which actions users take, such as page views, product views, cart additions, and purchases.
- Timestamps: When each action happened on your site.
- IP address: Used to determine geographic location.
- User agent: Device type, browser, and operating system.
- Cookies: Used for campaign measurement, optimization, and targeting.
Here is what that data lets your store do:
- Track conversions accurately. You can see which ads generated real sales, not just clicks.
- Build retargeting audiences. Re-serve ads to users who viewed a product but did not complete a purchase.
- Create lookalike audiences. TikTok uses your buyer data to find new users who behave similarly to your existing customers.
- Optimize ad delivery. TikTok’s algorithm uses conversion signals to lower your cost per acquisition over time.
Without the pixel, you are running ads with no feedback loop.
TikTok Pixel vs. Events API: What’s the Difference and Do You Need Both?
The TikTok Pixel fires from the user’s browser. The Events API sends conversion data directly from your server to TikTok, with no browser involved.
According to TikTok’s official Events API documentation, TikTok recommends using both the Pixel and Events API together to maximize measurement and campaign performance. The Pixel captures standard browser-based events. The Events API fills in the data that gets lost to ad blockers and iOS tracking restrictions.
| TikTok Pixel | Events API | |
| Tracking method | Client-side (browser) | Server-to-server |
| Blocked by ad blockers | Yes | No |
| Affected by iOS restrictions | Partially | Reduced significantly |
| Setup complexity | Low | Medium to high |
| Best use case | Foundation install for all stores | Paired with Pixel for complete coverage |
Start with the Pixel. Add the Events API once your store is generating consistent ad spend and you want the most complete data picture possible.
Before You Start: What You Need to Set Up TikTok Pixel
You need three things before you start:
- An active TikTok Ads Manager account at ads.tiktok.com. The pixel is created inside Ads Manager, not the TikTok app.
- Admin access to your eCommerce platform. Shopify and WooCommerce users need admin permissions to install apps or plugins.
- Access to your website’s backend. Manual installs require the ability to edit HTML or theme files.
No developer is needed for Shopify or WooCommerce installs. GTM and fully manual setups require basic comfort with code.
How to Set Up TikTok Pixel for eCommerce (Step-by-Step)
These steps create the pixel inside Ads Manager. Complete them before moving to platform-specific installation.
- Log in to TikTok Ads Manager.
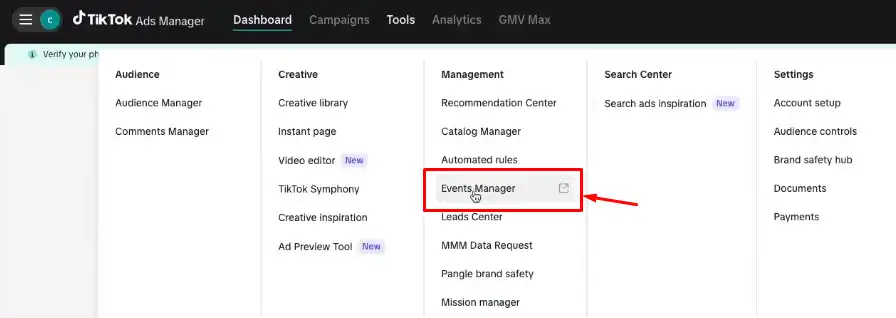
2. Click Tools in the top navigation bar.
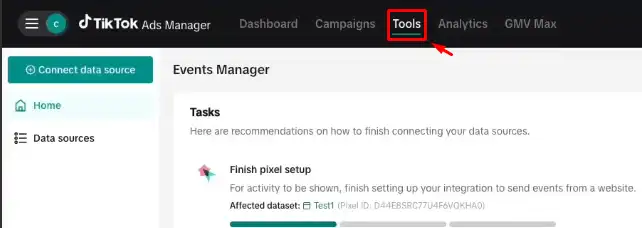
3. Select Events Manager.
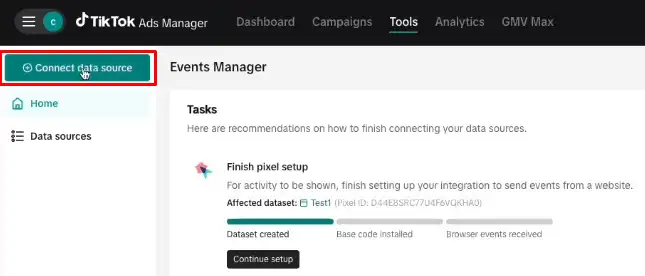
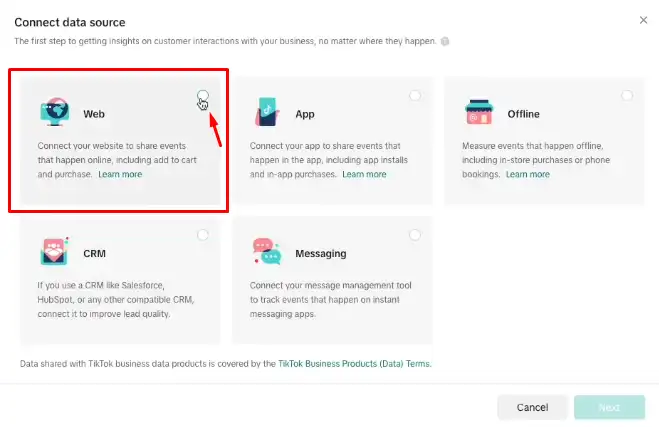
4. Click Connect Data Source.
5. Select Web.
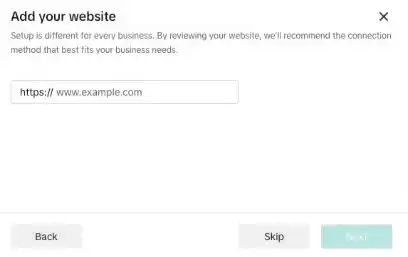
6. Enter your website URL.
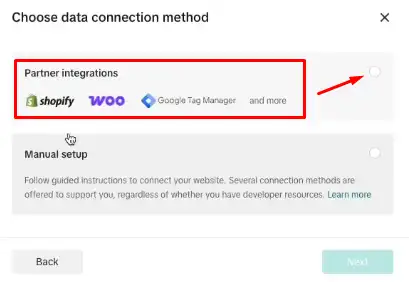
7. Choose Partner Integration (for Shopify, GTM, and supported platforms) or Manual Setup.
8. Name your pixel. TikTok recommends using your website or domain name. The maximum character limit is 128 characters.
9. Copy your Pixel ID. You will need this during installation.
Follow the guided steps for your chosen install method.
Your Pixel ID is a unique numeric string tied to your pixel. You can always retrieve it from Events Manager, but save it now to keep your setup moving.
Pro Tip: Not sure if your pixel is configured correctly before you move to installation? Use our free TikTok Pixel Setup Helper to check your setup in seconds. It walks you through the exact configuration your store needs so you go into installation with zero guesswork.
How to Install TikTok Pixel on Shopify, WooCommerce, and Manually
Shopify: Native Integration (Recommended)
Shopify has a direct TikTok integration that installs your pixel without any code changes.
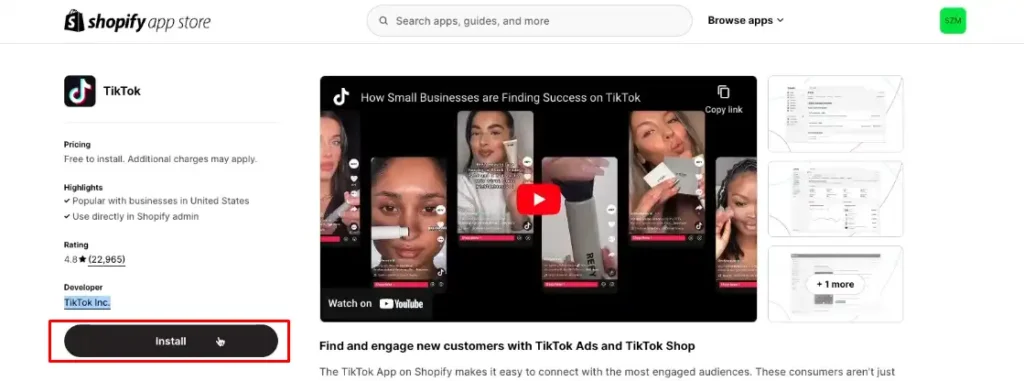
In your Shopify admin, go to Apps and search for TikTok.
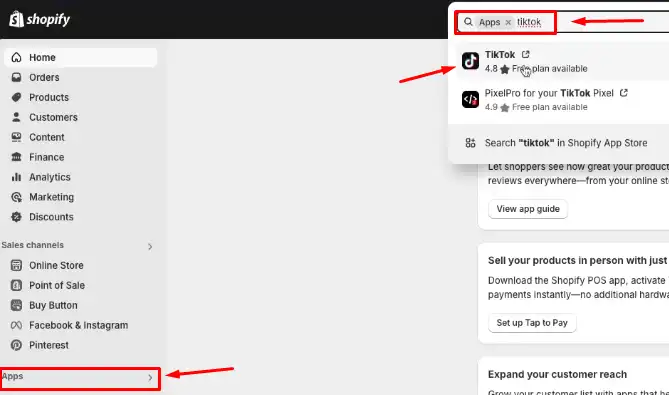
Install the official TikTok app by TikTok Inc.
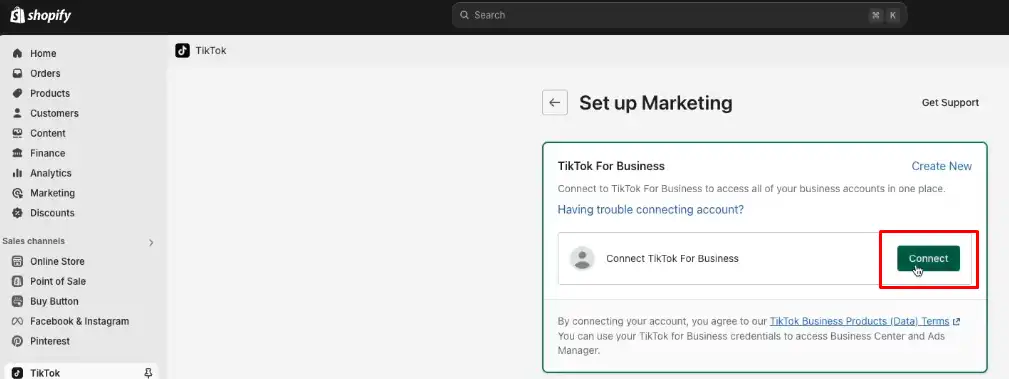
Connect your TikTok Ads Manager account.
Select your existing pixel or create a new one inside the app.
Enable Advanced Matching to improve conversion match rates.
The Shopify integration automatically fires key standard events across your entire storefront, including ViewContent, AddToCart, InitiateCheckout, and CompletePayment.
WooCommerce: Plugin and Manual Install
The cleanest WooCommerce method uses the official plugin.
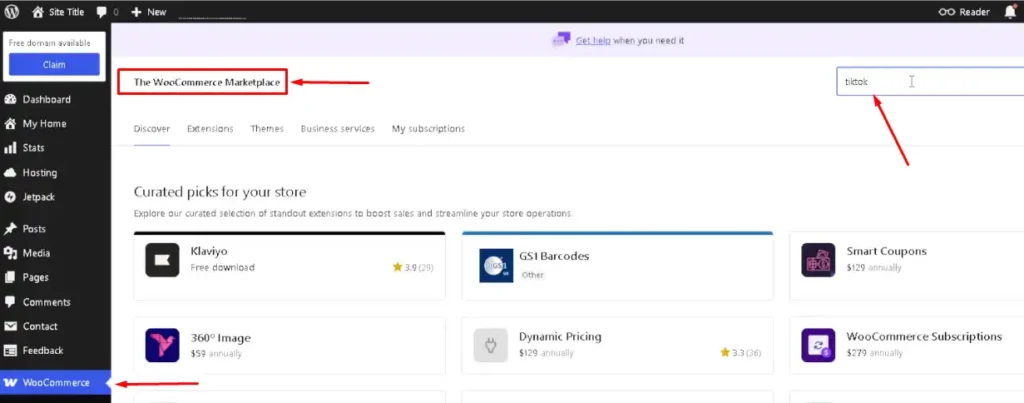
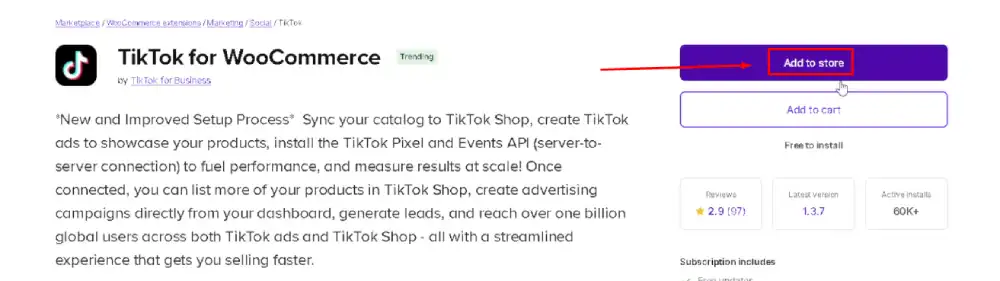
In your WordPress dashboard, go to Plugins and search for TikTok for WooCommerce.
Install and activate the official plugin.
Connect it to your TikTok Ads Manager account.
Select your pixel from the plugin settings.
Enable automatic event tracking for standard eCommerce events.
For manual installation on WooCommerce, add the pixel base code directly to your theme’s <head> section using Appearance > Theme Editor, or through a header and footer plugin. The base code contains your Pixel ID and must load on every page.
Manual Install via Google Tag Manager (GTM)
GTM is the best option for stores that manage multiple tracking tags or want a no-code event configuration interface.
- In TikTok Events Manager, select Web, then choose Google Tag Manager as your partner.
- Click Client-side tagging, then log in to the Google account linked to your GTM workspace.
- Select your GTM account, container, and workspace.
- Choose your event setup method. TikTok recommends Set up with TikTok Event Builder, which lets you configure events directly from your live website without requiring changes to website code.
- Review the pending GTM changes and click Publish.
As per TikTok’s GTM documentation, clicking Publish automatically installs all required tags, triggers, and variables inside your container.
How to Verify Your Pixel Is Working
Installing the pixel is not the finish line. You need to confirm it fires correctly on every page and event before spending money on ads.
TikTok gives you three verification methods, as outlined in TikTok’s official pixel setup guide:
Option 1: TikTok Pixel Helper (Best for desktop verification), TikTok Pixel Helper is a free Chrome extension built by TikTok. After installing it from the Chrome Web Store, visit your website. The extension icon shows whether the pixel is firing, which events are being detected, and any errors at the pixel, event, or parameter level. It is the fastest way to spot problems without needing to access Ads Manager.
Option 2: Test Events in Events Manager, Inside Events Manager, open your pixel, and navigate to the Test Events tab. Enter your website URL to generate a QR code. Scan the QR code using the Discover tab on the TikTok mobile app, then navigate your site and perform actions such as adding a product to your cart. Each event you trigger appears in Events Manager in real time, confirming whether your setup is working correctly.
Option 3: Diagnostics Tab, The Diagnostics tab in Events Manager surfaces active issues with your setup and provides specific fix recommendations. Per TikTok’s documentation, if you dismiss an issue and it reappears within 24 hours, the fix did not take, and you need to revisit the implementation.
Common TikTok Pixel Setup Problems and How to Fix Them
| Problem | Likely Cause | Fix |
| Pixel not firing at all | Base code missing or placed incorrectly | Confirm code is in <head> on all pages using Pixel Helper |
| Events not recording | Events not configured in Events Manager | Set up standard events via the Event Builder |
| Duplicate conversions | Pixel and Events API are both firing without deduplication | Enable Event Deduplication in Events Manager |
| “No recent activity” status | No site traffic for 7+ consecutive days | Send test traffic or verify that the base code was not removed |
| iOS conversions missing | Browser-level tracking restrictions | Add the Events API as a second data channel |
| Data discrepancy across platforms | Attribution window mismatch | Align attribution windows across TikTok, GA4, and other tools |
The most common issue we see is the pixel firing on some pages but not others. This happens when the base code is added only to a homepage template rather than applied site-wide.
How to Find Your TikTok Pixel ID
Your Pixel ID is the unique identifier for your pixel. You need it for manual installs, third-party app connections, and troubleshooting.
To locate it:
- Log in to TikTok Ads Manager.
- Click Tools, then Events Manager.
- Select your pixel from the list.
- Your Pixel ID appears at the top of the pixel overview page, directly below the pixel name.
You can also find it inside the pixel base code itself. It is the numeric string inside the ttq.load() function. For example: ttq.load(‘CXXXXXXXXXXXXXXXXX’). That string is your Pixel ID.
Explore these helpful articles next:
👉 TikTok Ads Budget Strategy for Small Businesses
👉 Common TikTok Ads Mistakes New Advertisers Make
👉 Lead Gen with TikTok Ads: Minimizing CPL
👉 TikTok Ads for Fashion & Apparel: Creative Trends to Copy
Frequently Asked Questions About TikTok Pixel
Is TikTok Pixel free to use?
Yes, TikTok Pixel is completely free. You pay nothing to create or install it. The only costs involved are your TikTok ad spend, which is separate from the pixel itself. There are no pixel usage fees regardless of how much conversion data it collects.
Can I install TikTok Pixel without coding experience?
Yes. Shopify and WooCommerce users can install the pixel through the official TikTok app or plugin, which requires no code changes. If you prefer full manual installation, you will need to paste a JavaScript snippet into your site’s HTML, which most platforms make accessible through theme settings.
How do I know if my TikTok Pixel is working?
Install the TikTok Pixel Helper Chrome extension, then visit your website. The extension shows whether your pixel is active, which events are firing, and flags any errors. You can also run a live test inside the Test Events tab in Events Manager.
What is the difference between TikTok Pixel and the Events API?
TikTok Pixel fires from the user’s browser and is easy to install on any website. The Events API sends data from your server directly to TikTok, bypassing the browser entirely, which means it is not affected by ad blockers or iOS tracking restrictions. TikTok officially recommends using both together for the most complete tracking coverage.
Which TikTok Pixel events should I set up for an eCommerce store?
You should set up four core events at a minimum: ViewContent, AddToCart, InitiateCheckout, and CompletePayment. These four events map directly to the purchase journey and give TikTok’s algorithm the conversion signals it needs to optimize ad delivery and lower your cost per purchase over time. Additional events, such as Search and Registration, are optional but useful depending on your store type.
Does TikTok Pixel work with Shopify?
Yes. Shopify has a native TikTok integration available through the Shopify App Store. Once you connect your TikTok Ads Manager account, the integration installs your pixel automatically and fires standard eCommerce events across your entire store, including checkout and purchase confirmations, without any manual code work required.
Conclusion
A TikTok Pixel that is installed, verified, and firing correctly is the foundation of every eCommerce campaign that actually performs. Without it, your ad data is incomplete, your retargeting audiences are thin, and TikTok’s algorithm has nothing reliable to optimize against.
We covered the core difference between the Pixel and the Events API, and why using both is the right long-term approach for serious eCommerce stores. We walked through installation on Shopify, WooCommerce, and via GTM.
We covered how to verify the pixel using the Pixel Helper extension and the Test Events tool, and how to diagnose the most common errors before they affect live campaigns.
The setup is straightforward when you follow the steps in order. Take 30 minutes now to get it right, and every TikTok campaign you run after that will have the data foundation it needs to improve.