
If you are relying solely on a one-click partner integration (like the default Shopify or WooCommerce app) for your TikTok tracking, you are likely losing 30-50% of your attribution data.
Browser blockers, iOS privacy updates, and app glitches often strip away the data needed to feed the algorithm.
Get Up to $6,000 in Free TikTok Ad Credits
TikTok offers ad credit incentives for new advertisers, helping you test campaigns with a lower upfront cost.
To scale past $5k/month in ad spend, you need Granular Control. You need to know exactly when a View Content turns into an Add to Cart, and you need to pass that data securely to TikTok without relying on a third-party plugin that might break on Black Friday.
This guide is the technical playbook for setting up the TikTok Pixel manually. We will cover the Base Code injection, hard-coding Standard Events with dynamic parameters, and the 2026 standard of Hybrid Tracking using the Events API.
Table of Contents
Quick Summary
- Why Manual? Plugins often fail to pass Match Keys (Email/Phone) effectively. Manual setup ensures you own the data pipeline.
- The Hybrid Model: In 2026, you must run Browser Pixel + Events API (Server-Side) simultaneously with Event Deduplication enabled.
- Critical Parameters: Every eCommerce event must include content_id, value, and currency to unlock ROAS tracking.
- Verification: Use the TikTok Pixel Helper 2.0 (Chrome Extension) to verify events before spending a dollar.
1. The Foundation: Base Code Installation
The Base Code is the heartbeat of your tracking. It initializes the library and tracks page views.
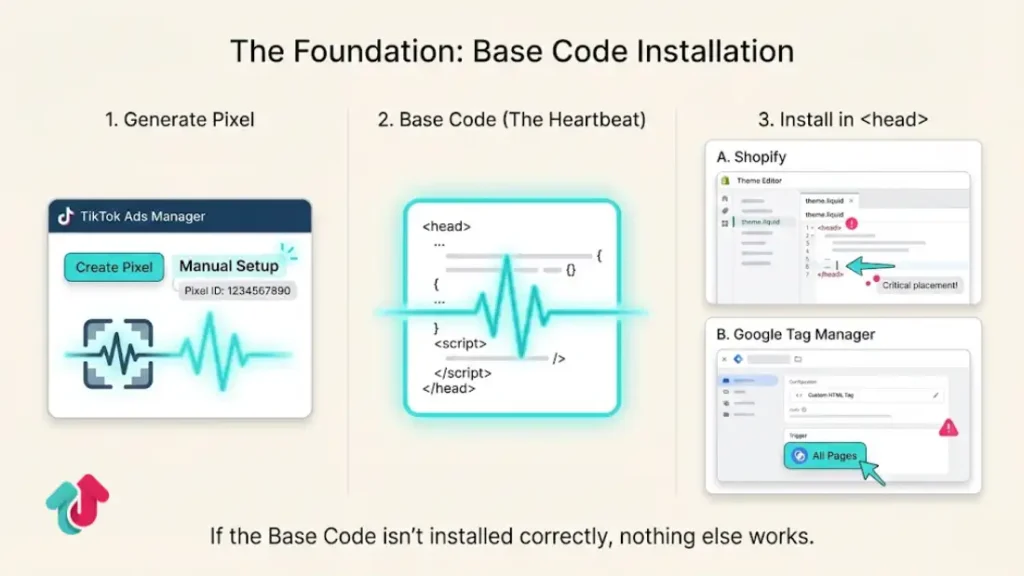
Step 1: Generate the Pixel
- Go to TikTok Ads Manager > Tools > Events.
- Select Web Events and click Create Pixel.
- Choose Manual Setup (Not Partner Setup).
- Give it a name (e.g., BrandName_Manual_2026).
Step 2: Inject into Header
TikTok provides a JavaScript snippet. This must go into the <head> section of your website’s theme code.
- For Shopify: Go to Online Store > Themes > Edit Code > theme.liquid. Paste it right before the closing </head> tag.
- For GTM (Google Tag Manager): Create a Custom HTML tag. Paste the code and set the trigger to All Pages.
2. Hard-Coding Standard Events (The Money Data)
This is where manual setup beats plugins. You are going to specifically tell TikTok what a Purchase looks like on your site.
Do not use the Event Builder (Click-based) tool for eCommerce. It is imprecise. Use Developer Mode (Custom Code).
The View Content Event (Product Page)
Fire this when a user views a product.
Code Snippet:
JavaScript
ttq.track(‘ViewContent’, {
content_id: ‘12345’, // Must match your Catalog SKU
content_type: ‘product’,
content_name: ‘Premium Leather Bag’,
currency: ‘USD’,
value: 150.00
});
The Add to Cart Event (ATC)
Fire this when the Add to Cart button is clicked.
Code Snippet:
JavaScript
ttq.track(‘AddToCart’, {
content_id: ‘12345’,
content_type: ‘product’,
currency: ‘USD’,
value: 150.00
});
The Complete Payment Event (Purchase)
Crucial: This must fire only on the Thank You / Order Confirmation page.
Code Snippet:
JavaScript
ttq.track(‘CompletePayment’, {
content_id: ‘12345’,
content_type: ‘product’,
currency: ‘USD’,
value: 150.00,
description: ‘Order #9999’
});
Pro Tip for Dynamic Values: If you are using GTM, replace the static values (like ‘150.00’) with GTM Data Layer variables (e.g., {{dlv – transactionTotal}}). This ensures the pixel captures the real cart value for every specific customer.
3. Advanced Tracking: Events API (Server-Side)
Browser tracking is dying. Safari and iOS block cookies. The Events API (CAPI) bypasses the browser and sends data directly from your server to TikTok.
How to Set It Up Manually
Generate Access Token:
- Go to your Pixel Settings in Ads Manager.
- Scroll to Events API.
- Click Generate Access Token. Save this key securely.
The Server Setup:
- The easiest manual method is using Server-Side GTM (sGTM).
- Use the official TikTok Events API template in sGTM.
- Paste your Access Token and Pixel ID.
Event Deduplication:
- You will now be sending two Purchase events (one from Browser, one from Server).
- To prevent double-counting sales, you must pass an Event ID (e.g., the Order ID) with both events. TikTok will see that they match and keep only one.
4. Advanced Matching (Email & Phone Hashing)
TikTok needs to know who the buyer is to match them to a user account.
Automatic Advanced Matching: Turn this toggle ON in Pixel Settings. It attempts to scrape email fields automatically.
Manual Advanced Matching: For higher match rates, pass the email/phone in the code itself:
JavaScript
ttq.identify({
email: ‘[email protected]’, // Pass hashed or raw (TikTok will hash it)
phone_number: ‘+15551234567’
});
Place this code BEFORE the ttq. track event fires.
5. Verifying Your Setup
Never assume it works. Verify it.
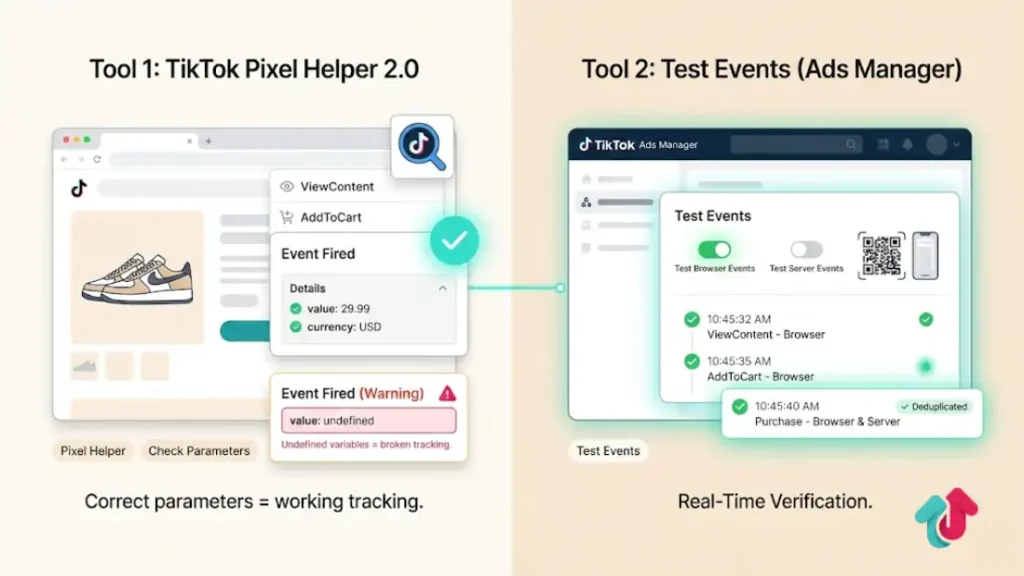
Tool 1: TikTok Pixel Helper 2.0
Download this Chrome Extension.
- Go to your product page. Click the helper icon.
- Green Check: Event fired successfully.
- Check Parameters: Expand the event to ensure the value and currency are correct. If the value says undefined, your code variables are broken.
Tool 2: Test Events in Ads Manager
- Go to Events Manager > Test Events.
- Select Test Server Events or Test Browser Events.
- Generate a QR code and open your site.
- Perform a test purchase. You should see the events appear in real-time in the dashboard.
Explore these helpful articles next:
👉 TikTok Ads Budget Strategy for Small Businesses
👉 Common TikTok Ads Mistakes New Advertisers Make
👉 Lead Gen with TikTok Ads: Minimizing CPL
👉 TikTok Ads for Fashion & Apparel: Creative Trends to Copy
FAQ: Pixel Setup Troubleshooting
What is the difference between ViewContent and Pageview?
Pageview fires on every page load (Home, About Us, Blog). ViewContent identifies a specific product being viewed. You need ViewContent for Dynamic Product Ads (DPA) re-targeting.
Why is my ROAS showing as 0.00?
You likely forgot to pass the value parameter in your Purchase event code. If TikTok receives the event but no dollar amount, it cannot calculate ROAS.
Can I use Google Tag Manager for this?
Yes, GTM is the recommended way to handle manual code. It keeps your site code clean. Use Custom HTML tags for the browser pixel and the TikTok Template for Server-Side GTM.
What is Event Deduplication?
If you use both Browser and Server tracking, TikTok might count one sale as two. Deduplication uses a unique key (Event ID) to merge them. If you are just starting, stick to Browser-only until you are ready for the technical lift of Server-Side.
Do I need a developer for this?
If you are using Shopify, you can do 90% of this with GTM templates. However, for Data Layer variables (getting the dynamic price), a developer or a specific Data Layer plugin is highly recommended.
Conclusion
Manual pixel setup is the difference between guessing and knowing. By hard-coding your events, you ensure that your data is accurate, your ROAS is real, and your retargeting audiences are populated with high-intent buyers.
Start with the Base Code and Purchase Event today. Once those are firing correctly, layer on the Events API to future-proof your brand against privacy blocks.
Also, to simplify the process, try our free TikTok Pixel Setup Helper to create and configure your pixel correctly.